To turn or not to turn
Easy access for turning with a three sided pallet bin
Aeration is necessary to provide the composting microbes and larger creatures with the oxygen necessary to convert the organic matter into compost and to achieve the temperatures necessary for the more rapid decomposition of hot aerobic composting.
If the material is not turned composting will still happen but will take longer, a year or 18 months in some cases, and may become anaerobic. Aeration by turning the composting material will involve extra work but I believe it is worth it.
The main reason for turning the material is that it introduces more oxygen into which increases the speed of decomposition by the aerobic composting bacteria. quickly break down a compost pile. This is results in the heap a heating up.
An additional benefit is that the process of turning the heap will break up any matted material which may have started to decompose anaerobically producing greenhouse gases and decomposing more slowly. Turning also in opening the material increases surface area of the organic matter resulting in faster decomposition. A further benefit is that it enables the moisture content of the pile to be checked and adjusted.
If using pallet or New Zealand bins without a front, or where the front panels can be easily removed, the material to be turned from one bin to the next using a garden fork. However, there are other techniques and bins which avoid the need to turn the contents and as some of these are applicable to the entry level Dalek bin, I will start with them.
Building air into the bin

The Hotbin tool used to rake the compost.
This is useful tool for other bins. Try using the handle from a paint roller
Aeration at the base
Mount the bin or pile on an old pallet, this will need replacing as it rots but is easily checked when the bin is emptied, or build a base out of good quality wood about 3-6 inches off the ground to allow access of air into the base. The slats need to be spaced to allow entry of air but sufficiently close together to prevent the entry of rats and other vermin.
Start the composting by creating a base layer of twigs or small branches from pruning shrubs, brassica stalks etc as a base level to allow air to flow up into the compost. I find hollow stems such as are found on Jerusalem artichokes to be quite effective. This base layer will not rot down as quickly as the rest of the material and may make it difficult to empty the bin using the hatch but if this is a problem a Dalek type composter can be knocked over or lifted of the compost when harvesting. Some add more twigs and scatter them throughout the pile to assist in aeration but this approach is only applicable if the contents are not to be turned as the sticks make it difficult to makes it more difficult to turn the pile using a fork. Another source suggests that if building a heap or pile, rather than filling a bin, long sticks could be laid horizontally to crisscross the heap at different levels with hand holds protruding from the pile. As the heap matures the ends of the of the sticks can be turned, lifted and shaken to help aerate the pile .
At home with a small garden and a steady supply of food waste (nitrogen rich greens) you may opt for a system whereby a kitchen caddy of material is added to the bin every few days with cardboard or shredded computer paper as the main source of browns. If this is the case air spaces can be built into the heap by adding egg boxes, the cardboard tubes from toilet and kitchen newspaper and crumpled corrugated cardboard. The addition of a bulking agent. such as woodchip. absorbs water from the food waste and helps maintain the air spaces.
Hotbin advise that in their bin the correct use of a buking agent, such as partially composted woodchip, will provide and maintain sufficient air spaces for the bin to work effectively. This passive aeration occurs where rising hot air pulls cold air into the heap. This is said to work in heaps up to 3m high providing there is adequate ‘free air space' . Although Hotbin do not recommend turning the compost in their bin they do recommend occasionally stirring or raking new material being added into the active top 10-20cm of the waste. This both mixes microbes already working in the active layer of the bin with the new material and breaks up any lumps forming in the last batch of material added. I find that this is essential after waste food has been tipped into the bin from a kitchen caddy.
Aeration systems

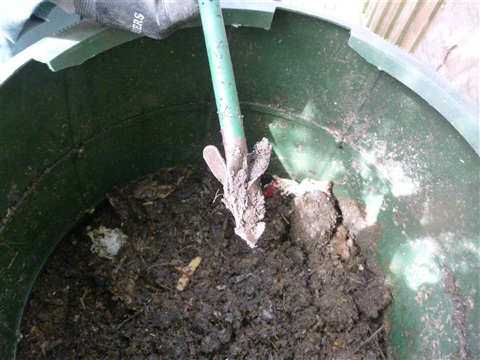
Gutter downpipe drilled for use as an aeration system in the middle of a compost binj
Some of the more expensive bins, such as the Aerobin 400, (Plastic Compost Bins) have a central aeration system which is said to do away with the need to turn the compost. Home composters can create their own aeration tube by drilling holes in plastic downpipe and placing this in the centre of the bin as soon sufficient material has been added to keep it vertical added. A tube made of rigid plastic clematis support will fulfil the same purpose. Ideally the tube should reach from the bottom of the bin to a couple of inches above the organic material. In larger bis two of three may be required. A refinement of this technique is to run a horizontal pipe along the ground so that both ends stick out of the base of the pile, with a right-angle connector in the middle to take the vertical pipe. Air holes are drilled in both the horizontal and vertical pipes. The compost bin is placed on top of the horizontal pipe either by drilling two holes at the bottom of the bin of through the pallet base build so that the vertical pipe is in the middle of the bin. While I have used a single pipe down the centre of the bin, I have not tried this type of aerator
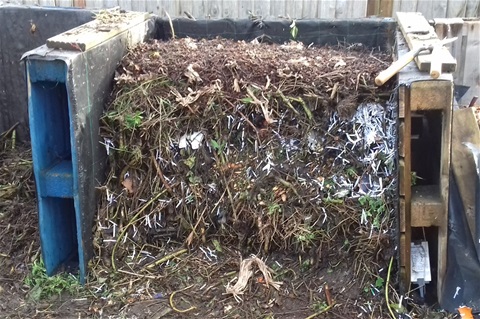
No-turn pallet bin
It is possible to make compost in a traditional bin using a good combination of green and brown layers without turning and reach a temperature approaching 80°C. Shewell-Cooper described such a system in 1972 using wooden bins ranging in size from 4ft x 4ft to 10ft x10ft. depending on the size of the garden all the bins were 6-7ft high. The wooden bins were open fronted and slatted with a 1” ventilation spaces between the planks. This system produced compost in six months. In the original description of this method all the garden and any kitchen waste is mixed together in a 6” vegetable layer consisting of items such as the tops of beans and peas, torn up leaves of cabbages and sprouts, bashed up stalks of brassica, all weeds, lawn mowings, peelings from fruit and vegetables, egg shells, woollen and cotton scraps, hair, soaked and torn up newspaper, leaves old bedding plants and a little sawdust etc. I have varied this technique slightly in my own no-turn composting by dividing the vegetable layer into separate layers of greens and browns to make it easier to achieve the C:N balance.
The six-inch-deep vegetable layers are trodden down and made level; this being considered essential for the technique to work. On the smaller pallet bins, I compress and level the layers using the back of a spade and a plank. An interesting aid advocated by Sherwell-Cooper is to mark the 6” levels on the corner posts of the bin. It is not necessary to fill the bins in a single batch provided the six inch and level law is followed.
Turning the contents: Hot Composting
In order to create finished compost in a short time and to kill seeds and perennial weeds hot composting is required with the contents of the bin being turned regularly during the initial stages. This can be at fixed times ( Hot Composting ) or every time the bin temperature drops below 40°C (or about 100° F) . please note that turning procedures based on timed turning should not involving turning more frequently than every 2 or 3 days. Daily turning has been shown to inhibit the development of fungi and actinomycetes.
Turning offers the opportunity to check the moisture level. A handful of compost can be subjected to the squeeze test or the moisture can be measured using a meter. If material contains much more than 70% moisture additional browns can be added. In the UK this might be additional cardboard or shredded paper or dried leaves, in the US. If the material is to dry it can be watered with a hose or watering can as it is turned.
A hot compost bin is normally used to batch compost material, so it is recommended that sufficient brown and green material is collected and stored separately until there is enough to fill the bin or make a 3-foot pile. This lends itself to regular turning to maintain a temperature of 40°C+.
Hand turning using a garden fork (bin) or pitchfork (heap) can be used to home compost in a heap, New Zealand box or pallet bin particularly if the material is being transferred to an empty adjacent bin. It is easiest to move the material from one bin to another. The material on the outside of the heap is turned to become the centre of the rebuilt heap while inside core will become the outside of the rebuilt heap. If there is only one bin it the material can be moved onto a tarpaulin and then moved back again.
At the end of the hot composting process the immature compost is often store in a maturation bin to free up the main working bins forms for the next batch of composting. Moving the compost to the maturation bin can be considered as the final turn
Compost Tumblers
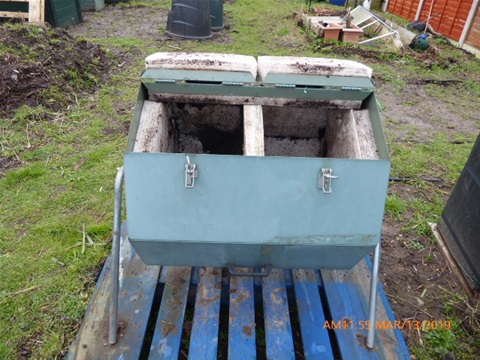
Jora dual chamber composter used for cooked food waste
These can be used for both hot and cool composting but they are most useful for hot batch composting. It is now possible to buy dual chamber composting for more or less continous use.
If using a compost tumbler, the material is turned and aerated by turning the whole drum it also helps to control the moisture content of the material to prevent the compaction that may occur in wet material. The effectiveness of this type of compost bin at aerating the material varies with the shape of the bin, the shape of any internal bars to break up lumps, the moisture content and the weight of the bin when filled to working capacity.
The Jora shown in the photo is easily turned and has two insulated chambers
Windrows
In a large garden windrows may be used to compost shredded mixed garden waste, such as grass cuttings, pruning and leaves. The windrows should be turned on a regular basis to aerate the content with the outer layers being moved to form the core of the new windrow with the material from the centre of the established windrow being placed round it.
Cool Composting
If using the slower cool compost approach adding a mixture of brown and green materials to the bin weekly as they become available requires less effort but may not kill weeds. Under this type of composting the organic material at the bottom of the bin is ready for use after about a year while the top layers always consist of relative fresh waste. The material is not usually turned, and harvesting is through a hatch at the bottom of the bin. Some composters, usually those with several bins, do turn the do aerate the material by lifting the bin off the compost and refilling it.
Alternatively, a compost aerator tool can be used. These usually consist of a metal rod/ handle with some hinged metal arms with teeth on the end. This is plunged into the compost and the teeth will open out as it is pulled out and create air pockets inside the compost. A second type have a large corkscrew on the end which is turned into the compost. While tools of this type do not aerate the bin as effectively as turning, they do break up any matted waste or lumps which may have encouraged anaerobic organisms. A broom stick can also be used to make air holes.


Latest comments
Do you have any data on ' application ' of Aerated Vermi Compost Tea to Mangoes and benneficial outcomes .
Very informative site. Having been away for 5 weeks and returning to evidence of rats under and around the compost bin, I can testify to lack of human activity allowing the rats to get comfortable.
can i use dog manure in compost and mulching leaves?
What is the C and N ratio for coffee chaff?